
iOS 入门(5):在本地存储数据
2016-02-15
本文主要讲解如何使用 SQLite + FMDB 来存储数据到本地数据库。本文的内容只包含最基本的知识点。
教程
目录:
- 1、引用 FMDB 库
- 2、使用 SQLite 数据库来存储本地数据
- 2.1、实现数据库管理代码 STDBManager
- 2.2、实现 Model/Entity 层代码
- 2.2、实现 Model/Service/LocalService 层代码
- 2.3、完成 Controller 层代码逻辑
1、引用 FMDB 库
修改 Podfile 如下来增加对 FMDB 库的引用:
source 'https://github.com/CocoaPods/Specs.git'

platform :ios, "8.0"
target "iOSStartDemo" do
    pod 'SVProgressHUD', '1.1.3'
    pod 'Masonry', '0.6.3'
    pod 'AFNetworking', '3.0.4'
    pod 'SDWebImage', '3.7.5'
    pod 'FMDB', '2.6'
end
然后在项目目录下执行下列命令来安装新增的库:
$ pod install
代码解释:FMDB 是一个帮助我们更方便的使用 SQLite 数据库的库。
2、使用 SQLite 数据库来存储本地数据
在上一节教程中,我们实现了从网络请求数据。在这一节中,我们的需求是每次从网络请求数据成功后,将本次请求到的数据存储到本地数据库,并清理掉上一次存储的数据。在每次加载页面时,首先从本地数据库加载数据进行展示,再从网络请求数据对页面进行刷新。
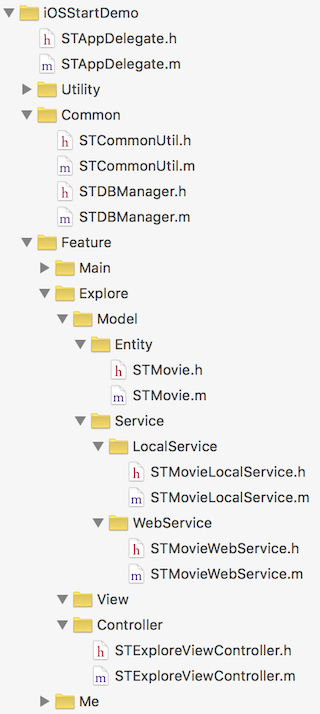
在项目中添加新代码文件:
- iOSStartDemo/Common/STDBManager.h(.m)
- iOSStartDemo/Feature/Explore/Model/Service/LocalService/STMovieLocalService.h(.m)
项目代码如下:
2.1、实现数据库管理代码 STDBManager
STDBManager.h 代码如下:
#import <Foundation/Foundation.h>

@interface STDBManager : NSObject

@property (strong, readonly, nonatomic) NSString *dbFilePath;

+ (instancetype)sharedInstance;
- (void)setupDB;

@end
STDBManager.m 代码如下:
#import "STDBManager.h"
#import <FMDB/FMDB.h>

static NSString * const STDBFileName = @"stdb.sqlite";

@interface STDBManager ()

@property (strong, readwrite, nonatomic) NSString *dbFilePath;

@end

@implementation STDBManager

#pragma mark - Property
- (NSString *)dbFilePath {
    if (!_dbFilePath) {
        NSArray *searchPaths = NSSearchPathForDirectoriesInDomains(NSDocumentDirectory, NSUserDomainMask, YES);
        NSString *documentFolderPath = searchPaths[0];
        _dbFilePath = [documentFolderPath stringByAppendingPathComponent:STDBFileName];
    }

    return _dbFilePath;
}

#pragma mark - Lifecycle
+ (instancetype)sharedInstance {
    static STDBManager *sharedInstance = nil;
    static dispatch_once_t onceToken;
    dispatch_once(&onceToken, ^{
        sharedInstance = [[self alloc] init];
    });

    return sharedInstance;
}

#pragma mark - Utility
- (void)setupDB {
    if ([self isDBFileExist]) {
        return;
    }

    BOOL isSuccess = [self copyDBFileFromMainBundle];
    if (isSuccess) {
        return;
    }

    if ([self createDB]) {
        [self updateDB];
    }
}

- (BOOL)isDBFileExist {
    return [[NSFileManager defaultManager] fileExistsAtPath:self.dbFilePath];
}

- (BOOL)copyDBFileFromMainBundle {
    BOOL result = NO;

    // Not find db file, need to copy backup db file.
    NSString *backupDBPath = [[NSBundle mainBundle] pathForResource:@"stdb" ofType:@"sqlite"];
    if (!backupDBPath) {
        // Not find backup db file.
        result = NO;
    } else {
        BOOL isSuccess = [[NSFileManager defaultManager] copyItemAtPath:backupDBPath toPath:self.dbFilePath error:nil];
        if (!isSuccess) {
            // Copy backup db file failed.
            result = NO;
        } else {
            result = YES;
        }
    }

    return result;
}

- (BOOL)createDB {
    if ([FMDatabase databaseWithPath:self.dbFilePath]) {
        return YES;
    }

    return NO;
}

- (void)updateDB {
    FMDatabaseQueue *dbQ = [FMDatabaseQueue databaseQueueWithPath:self.dbFilePath];
    [dbQ inTransaction:^(FMDatabase *db, BOOL *rollback) {
        [db executeUpdate:[NSString stringWithFormat:@"Create Table If Not Exists st_movie (rowid integer primary key not null, name text, year text, synopsis text, thumbnail_url text)"]];
    }];
}

@end
代码解释:STDBManager 主要是提供对本地数据库文件的管理功能,包括:创建数据库文件、初始化数据库表结构等等。
2.2、实现 Model/Entity 层代码
这里我们复用上一节教程中的 STMovie 类。
2.2、实现 Model/Service/LocalService 层代码
STMovieLocalService.h 代码如下:
#import <Foundation/Foundation.h>
#import "STMovie.h"

@interface STMovieLocalService : NSObject

#pragma mark - STMovieLocalService
+ (NSArray *)getAllMovies;
+ (int64_t)addOrUpdateMovie:(STMovie *)movie;
+ (BOOL)removeAllMovies;

@end
STMovieLocalService.m 代码如下:
#import "STMovieLocalService.h"
#import <FMDB/FMDB.h>
#import "STDBManager.h"

@implementation STMovieLocalService

#pragma mark - STMovieLocalService
+ (NSArray *)getAllMovies {
    NSMutableArray * __block objs = [[NSMutableArray alloc] init];

    NSString *sql = @"Select * From st_movie";
    FMDatabaseQueue *dbQ = [FMDatabaseQueue databaseQueueWithPath:[STDBManager sharedInstance].dbFilePath];
    [dbQ inDatabase:^(FMDatabase *db) {
        FMResultSet *resultSet = [db executeQuery:sql];
        while ([resultSet next]) {
            [objs addObject:[STMovieLocalService getObjectFromResultSet:resultSet]];
        }
        [resultSet close];
    }];

    return [objs copy];
}

+ (int64_t)addOrUpdateMovie:(STMovie *)movie {
    int64_t __block result = -1;

    NSString *sql = [NSString stringWithFormat:@"Replace Into st_movie (rowid, name, year, synopsis, thumbnail_url) Values (?, ?, ?, ?, ?)"];
    FMDatabaseQueue *dbQ = [FMDatabaseQueue databaseQueueWithPath:[STDBManager sharedInstance].dbFilePath];
    [dbQ inDatabase:^(FMDatabase *db) {
        if ([db executeUpdate:sql, [NSNumber numberWithLongLong:movie.rowid], movie.name, movie.year, movie.synopsis, movie.thumbnailImageURLString]) {
            result = (int64_t) [db lastInsertRowId];
        }
    }];

    return result;
}

+ (BOOL)removeAllMovies {
    BOOL __block result = NO;

    NSString *sql = @"Delete From st_movie";
    FMDatabaseQueue *dbQ = [FMDatabaseQueue databaseQueueWithPath:[STDBManager sharedInstance].dbFilePath];
    [dbQ inDatabase:^(FMDatabase *db) {
        result = [db executeUpdate:sql];
    }];

    return result;
}

#pragma mark - Utility
+ (STMovie *)getObjectFromResultSet:(FMResultSet *)resultSet {
    STMovie *movie = [[STMovie alloc] init];

    movie.rowid = [resultSet longLongIntForColumn:@"rowid"];
    movie.name = [resultSet stringForColumn:@"name"];
    movie.year = [resultSet stringForColumn:@"year"];
    movie.synopsis = [resultSet stringForColumn:@"synopsis"];
    movie.thumbnailImageURLString = [resultSet stringForColumn:@"thumbnail_url"];

    return movie;
}

@end
代码解释:这里主要封装了对本地数据库的 st_movie 表的数据进行增删查改的相关接口。
2.3、完成 Controller 层代码逻辑
修改 STExploreViewController.m 代码如下:
#import "STExploreViewController.h"
#import "STCommonUtil.h"
#import <SVProgressHUD/SVProgressHUD.h>
#import <Masonry/Masonry.h>
#import <SDWebImage/UIImageView+WebCache.h>
#import "STMovieWebService.h"
#import "STDBManager.h"
#import "STMovieLocalService.h"

static NSString * const STExploreCellIdentifier = @"STExploreCellIdentifier";

@interface STExploreViewController () <UITableViewDataSource, UITableViewDelegate>

@property (strong, nonatomic) UITableView *myTableView;
@property (strong, nonatomic) NSArray *movieList;

@end

@implementation STExploreViewController

#pragma mark - Property
- (UITableView *)myTableView {
    if (!_myTableView) {
        _myTableView = [[UITableView alloc] initWithFrame:self.view.bounds style:UITableViewStyleGrouped];
        _myTableView.delegate = self;
        _myTableView.dataSource = self;
    }

    return _myTableView;
}

#pragma mark - Lifecycle
- (void)viewDidLoad {
    [super viewDidLoad];

    // Setup.
    [[STDBManager sharedInstance] setupDB];
    [self setupUI];

    // Load data.
    [self requestData];
}

#pragma mark - Setup
- (void)setupUI {
    // Use full screen layout.
    self.edgesForExtendedLayout = UIRectEdgeAll;
    self.automaticallyAdjustsScrollViewInsets = YES;
    self.extendedLayoutIncludesOpaqueBars = YES;

    // myTableView.
    [self.view addSubview:self.myTableView];
    [self.myTableView mas_makeConstraints:^(MASConstraintMaker *make) {
        make.edges.equalTo(self.view);
    }];
}

#pragma mark - Utility
- (void)requestData {
    // Load data from local db.
    self.movieList = [STMovieLocalService getAllMovies];
    if (self.movieList.count > 0) {
        [self.myTableView reloadData];
    }

    // Load new data from server and update local db data.
    NSDictionary *parameters = @{@"pageLimit" : @30, @"pageNum" : @1};
    [STMovieWebService requestMovieDataWithParameters:parameters start:^{
        [SVProgressHUD show];
    } success:^(NSDictionary *result) {
        NSArray *newMovieList = [result objectForKey:@"movieList"];

        // Update local db data.
        [STMovieLocalService removeAllMovies];
        for (STMovie *movie in newMovieList) {
            [STMovieLocalService addOrUpdateMovie:movie];
        }

        // Update displayed data.
        self.movieList = newMovieList;
        [self.myTableView reloadData];
        [SVProgressHUD dismiss];
    } failure:^(NSError *error) {
        [SVProgressHUD dismiss];
    }];
}

#pragma mark - UITableViewDelegate
- (void)tableView:(UITableView *)tableView didSelectRowAtIndexPath:(NSIndexPath *)indexPath {
    [tableView deselectRowAtIndexPath:indexPath animated:YES];
}

- (CGFloat)tableView:(UITableView *)tableView heightForRowAtIndexPath:(NSIndexPath *)indexPath {
    return 50;
}

#pragma mark - UITableViewDataSource
- (NSInteger)numberOfSectionsInTableView:(UITableView *)tableView {
    return 1;
}

- (NSString *) tableView:(UITableView *)tableView titleForHeaderInSection:(NSInteger)section {
    return @"Movies";
}

- (NSInteger)tableView:(UITableView *)tableView numberOfRowsInSection:(NSInteger)section {
    return self.movieList.count;
}

- (UITableViewCell *)tableView:(UITableView *)tableView cellForRowAtIndexPath:(NSIndexPath *)indexPath {
    if (indexPath.row >= self.movieList.count) {
        return nil;
    }

    UITableViewCell *cell = [tableView dequeueReusableCellWithIdentifier:STExploreCellIdentifier];
    if (!cell) {
        cell = [[UITableViewCell alloc] initWithStyle:UITableViewCellStyleSubtitle reuseIdentifier:STExploreCellIdentifier];
    }

    STMovie *movie = [self.movieList objectAtIndex:indexPath.row];

    cell.textLabel.text = [NSString stringWithFormat:@"%@ - %@", movie.name, movie.year];
    cell.detailTextLabel.text = movie.synopsis;
    [cell.imageView sd_setImageWithURL:[NSURL URLWithString:movie.thumbnailImageURLString] placeholderImage:[STCommonUtil imageWithColor:[UIColor grayColor] size:CGSizeMake(27, 40)] completed:nil];
    cell.layer.shouldRasterize = YES;
    cell.layer.rasterizationScale = [UIScreen mainScreen].scale;

    return cell;
}

@end
代码解释:主要修改了 - (void)requestData 方法中的逻辑来完成我们前面说的需求:每次从网络请求数据成功后,将本次请求到的数据存储到本地数据库,并清理掉上一次存储的数据。在每次加载页面时,首先从本地数据库加载数据进行展示,再从网络请求数据对页面进行刷新。
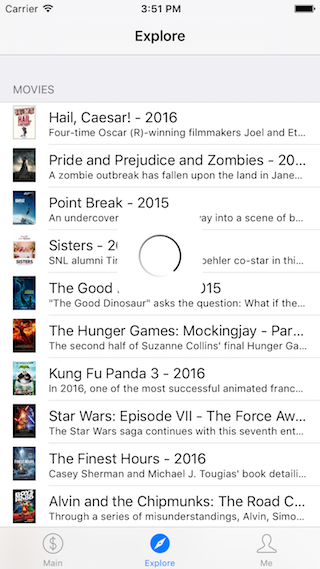
运行项目你应该能看到下面的界面:
Demo
你可以接着前面的教程继续下面的步骤来获取这一节对应的 Demo 代码:
如果你还没有下载 iOSStartDemo,请先执行下列命令下载:
$ git clone https://github.com/samirchen/iOSStartDemo.git
$ cd iOSStartDemo/iOSStartDemo
如果已经下载过了,则直接进入正确的目录并执行下列命令:
$ git fetch origin s5
$ git checkout s5
$ pod install
$ open iOSStartDemo.xcworkspace