
iOS 入门(3):实现一个多页面 App
2016-02-12
本文主要讲解基于 UITabBarController 和 UINavigationController 搭建一个多页面 App 项目。本文的内容只包含最基本的知识点。
教程
目录:
- 1、项目目录结构调整
- 2、Tab 式 + Navigation 式的项目架构实现
- 3、使用 UITableView
1、项目目录结构调整
这一节,我们会基于 UITabBarController、UINavigationController 做一个多页面 App 项目。我们这里说的「页面」一般对应的是 UIViewController。
做一个项目时,建立一个清晰的目录结构,对于提高自己和其他合作伙伴的效率都是大有好处的。对于具体的目录结构,每个人都有自己的偏好,这里列出一种供参考:
|—MyProject
    |—Utility // 自己实现的一些通用性较好的功能代码,这些代码有比较好的接口且与本项目不存在耦合,可直接复用于其他项目。
    |—Common // 本项目的一些全局性代码,这些代码通常与本项目的业务逻辑存在一些耦合,所以不放在 Utility 目录中。
    |—Feature // 本项目的功能模块目录,该目录下将项目的功能划分为多个模块,每个模块穿透 MVC,可以作为独立任务划分出去。当然,在模块下你不采用 MVC,采用 MVVM 或其他架构方式也没问题的。
        |—Base // 定义本项目中各种 Controller、View、Model 的基础类或基础接口。
            |—Controller
            |—View
            |—Model
        |—Main // 示例 Feature 1。
            |—Controller
            |—View
            |—Model
        |—User // 示例 Feature 2。
            |—Controller
            |—View
            |—Model
    |—Resource // 本项目的资源目录,放置图片、音频等资料。
        |—Image
        |—Sound
|—Pods // 采用 CocoaPods 管理的第三方库。
那么对应到我们现在讲的这个项目中,我们调整后的项目目录结构大致如下:
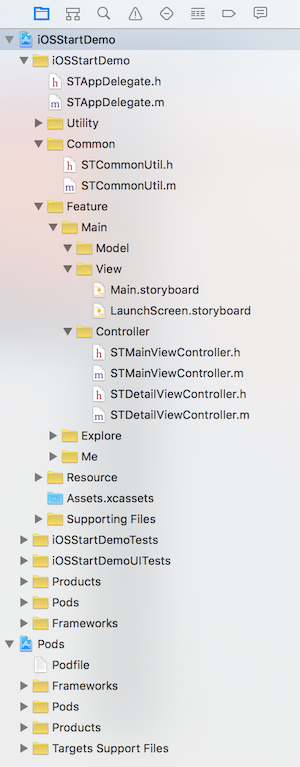
你可以看看 iOS 项目的目录结构来了解更多。
2、Tab 式 + Navigation 式的项目架构实现
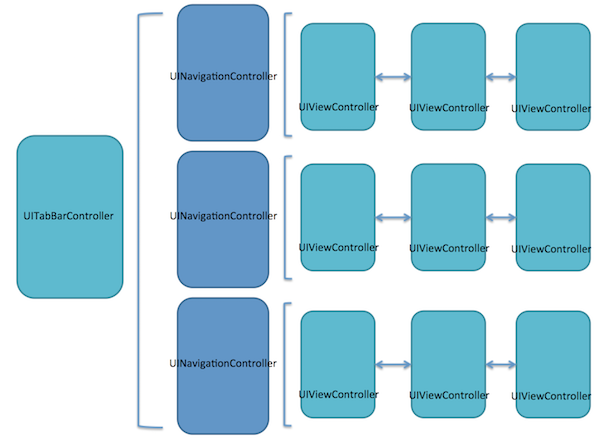
我们在实现一个多页面的 App 项目时,苹果官方提供的常用页面容器有 UITabBarController 和 UINavigationController。
UITabBarController 是通过数组的形式管理容器内的所有 UIViewController,UINavigationController 则是通过栈的形式管理容器内所有 UIViewController。这两种容器是可以嵌套使用的,标准嵌套的方式是以 UITabBarController 为主容器,而 UINavigationController 为辅助容器。大致结构如图:
下面,我们来看看代码:
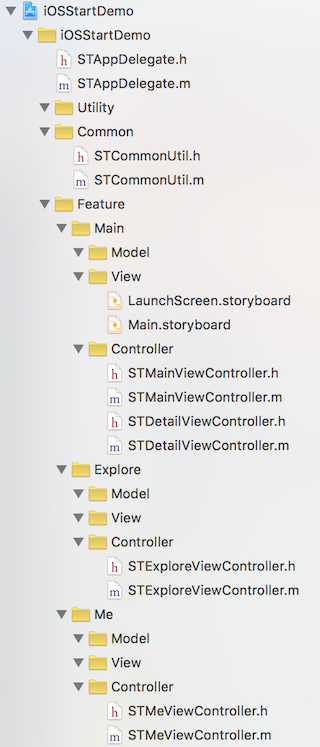
1)在项目中添加新页面的代码:
- iOSStartDemo/Feature/Main/Controller/STDetailViewController.h(.m)
- iOSStartDemo/Feature/Explore/Controller/STExploreViewController.h(.m)
- iOSStartDemo/Feature/Me/Controller/STMeViewController.h(.m)
添加工具类代码:
- iOSStartDemo/Common/STCommonUtil.h(.m)
大致结构如图:
2) 添加工具方法。
修改 STCommonUtil.h 代码如下:
#import <Foundation/Foundation.h>
#import <UIKit/UIKit.h>

@interface STCommonUtil : NSObject

#pragma mark - Image Util
+ (UIImage *)imageWithColor:(UIColor *)color;
+ (UIImage *)imageWithColor:(UIColor *)color size:(CGSize)size;

@end
修改 STCommonUtil.m 代码如下:
#import "STCommonUtil.h"

@implementation STCommonUtil

#pragma mark - Image Util
+ (UIImage *)imageWithColor:(UIColor *)color {
    return [STCommonUtil imageWithColor:color size:CGSizeMake(1.0, 1.0)];
}

+ (UIImage *)imageWithColor:(UIColor *)color size:(CGSize)size {
    CGRect rect = CGRectMake(0.0f, 0.0f, size.width, size.height);
    UIGraphicsBeginImageContext(rect.size);
    CGContextRef context = UIGraphicsGetCurrentContext();
    CGContextSetFillColorWithColor(context, [color CGColor]);
    CGContextFillRect(context, rect);
    UIImage *image = UIGraphicsGetImageFromCurrentImageContext();
    UIGraphicsEndImageContext();

    return image;
}

@end
代码解释:添加了两个用代码生成图片的工具方法。
3) 在应用程序的入口构建项目的框架。
修改 STAppDelegate.m 代码如下:
#import "STAppDelegate.h"
#import "STMainViewController.h"
#import "STExploreViewController.h"
#import "STMeViewController.h"
#import "STCommonUtil.h"

@interface STAppDelegate ()

@end

@implementation STAppDelegate

#pragma mark - UIApplicationDelegate
- (BOOL)application:(UIApplication *)application didFinishLaunchingWithOptions:(NSDictionary *)launchOptions {

    // Override point for customization after application launch.

    // Init.
    UIImage *tabImage = nil;
    UIImage *tabImageHighlight = nil;

    //// Main.
    STMainViewController *mainViewController = [[STMainViewController alloc] init];
    mainViewController.title = @"Main";
    tabImage = [[STCommonUtil imageWithColor:[UIColor redColor] size:CGSizeMake(30, 30)] imageWithRenderingMode:UIImageRenderingModeAlwaysTemplate];
    tabImageHighlight = [[STCommonUtil imageWithColor:[UIColor grayColor] size:CGSizeMake(30, 30)] imageWithRenderingMode:UIImageRenderingModeAlwaysTemplate];
    mainViewController.tabBarItem = [[UITabBarItem alloc] initWithTitle:mainViewController.title image:tabImage selectedImage:tabImageHighlight];
    UINavigationController *mainNavigationController = [[UINavigationController alloc] initWithRootViewController:mainViewController];

    //// Explore.
    STExploreViewController *exploreViewController = [[STExploreViewController alloc] init];
    exploreViewController.title = @"Explore";
    tabImage = [[STCommonUtil imageWithColor:[UIColor greenColor] size:CGSizeMake(30, 30)] imageWithRenderingMode:UIImageRenderingModeAlwaysTemplate];
    tabImageHighlight = [[STCommonUtil imageWithColor:[UIColor grayColor] size:CGSizeMake(30, 30)] imageWithRenderingMode:UIImageRenderingModeAlwaysTemplate];
    exploreViewController.tabBarItem = [[UITabBarItem alloc] initWithTitle:exploreViewController.title image:tabImage selectedImage:tabImageHighlight];
    UINavigationController *exploreNavigationController = [[UINavigationController alloc] initWithRootViewController:exploreViewController];

    //// Me.
    STMeViewController *meViewController = [[STMeViewController alloc] init];
    meViewController.title = @"Me";
    tabImage = [[STCommonUtil imageWithColor:[UIColor blueColor] size:CGSizeMake(30, 30)] imageWithRenderingMode:UIImageRenderingModeAlwaysTemplate];
    tabImageHighlight = [[STCommonUtil imageWithColor:[UIColor grayColor] size:CGSizeMake(30, 30)] imageWithRenderingMode:UIImageRenderingModeAlwaysTemplate];
    meViewController.tabBarItem = [[UITabBarItem alloc] initWithTitle:meViewController.title image:tabImage selectedImage:tabImageHighlight];
    UINavigationController *meNavigationController = [[UINavigationController alloc] initWithRootViewController:meViewController];

    //// Main tab bar controller.
    UITabBarController *mainTabBarController = [[UITabBarController alloc] init];
    mainTabBarController.viewControllers = @[mainNavigationController, exploreNavigationController, meNavigationController];

    self.window.backgroundColor = [UIColor whiteColor];
    self.window.rootViewController = mainTabBarController;
    [self.window makeKeyAndVisible];

    return YES;
}

@end
代码解释:在上面的代码中,我们构建了这个 App 的基本页面框架。以 UITabBarController 为主容器,并为其添加了 3 个 UINavigationController 子容器,初始化了每个 UINavigationController 的初始的 UIViewController,每个子容器独立管理其栈内的页面流。
4)使用 UINavigationController 来管理页面跳转。
修改 STMainViewController.m 代码如下:
#import "STMainViewController.h"
#import <Masonry/Masonry.h>
#import <SVProgressHUD/SVProgressHUD.h>
#import "STDetailViewController.h"

@interface STMainViewController ()

@end

@implementation STMainViewController

#pragma mark - Lifecycle
- (void)viewDidLoad {
    [super viewDidLoad];

    // Do any additional setup after loading the view, typically from a nib.

    // Setup.
    [self setupUI];
}

#pragma mark - Setup
- (void)setupUI {
    // Use full screen layout.
    self.edgesForExtendedLayout = UIRectEdgeAll;
    self.automaticallyAdjustsScrollViewInsets = YES;
    self.extendedLayoutIncludesOpaqueBars = YES;

    // Navigation item.
    UIBarButtonItem *detailBarButton = [[UIBarButtonItem alloc] initWithTitle:@"Detail" style:UIBarButtonItemStylePlain target:self action:@selector(goToDetailPage)];
    self.navigationItem.rightBarButtonItem = detailBarButton;

    // Hello button.
    UIButton *helloButton = [UIButton buttonWithType:UIButtonTypeSystem];
    [helloButton setTitle:@"Hello" forState:UIControlStateNormal];
    [helloButton addTarget:self action:@selector(onHelloButtonClicked:) forControlEvents:UIControlEventTouchUpInside];
    [self.view addSubview:helloButton];
    [helloButton mas_makeConstraints:^(MASConstraintMaker *make) {
        make.width.equalTo(@60.0);
        make.height.equalTo(@40.0);
        make.center.equalTo(self.view);
    }];
}

#pragma mark - Navigation
- (void)goToDetailPage {
    STDetailViewController *detailViewController = [[STDetailViewController alloc] init];
    detailViewController.hidesBottomBarWhenPushed = YES;
    [self.navigationController pushViewController:detailViewController animated:YES];
}

#pragma mark - Action
- (void)onHelloButtonClicked:(id)sender {
    NSLog(@"Hello, world!");

    [SVProgressHUD showSuccessWithStatus:@"Hello, world!" maskType:SVProgressHUDMaskTypeBlack];
}

@end
修改 STDetailViewController.m 代码如下:
#import "STDetailViewController.h"

@interface STDetailViewController ()

@end

@implementation STDetailViewController

#pragma mark - Lifecycle
- (void)viewDidLoad {
    [super viewDidLoad];

    // Setup.
    [self setupUI];
}

#pragma mark - Setup
- (void)setupUI {
    // Use full screen layout.
    self.edgesForExtendedLayout = UIRectEdgeAll;
    self.automaticallyAdjustsScrollViewInsets = YES;
    self.extendedLayoutIncludesOpaqueBars = YES;
    self.view.backgroundColor = [UIColor whiteColor];

    // Title.
    self.title = @"Detail";
}

@end
代码解释:在 STMainViewController 的 setupUI 方法中,我们添加了 detailBarButton,通过这个点击这个按钮,我们可以跳转到一个 STDetailViewController 页面,跳转的代码实现就在 goToDetailPage 方法中。
3、使用 UITableView
UITableView 是 iOS 开发中最常使用的数据展示控件之一,它体现了大多数 Cocoa UI 组件的设计思路,也是我们封装自定义组件时的重要参考模板。
我们在 Explore 页面中添加 UITableView 来做一些基础内容展示,修改 STExploreViewController.m 文件代码如下:
#import "STExploreViewController.h"
#import "STCommonUtil.h"
#import <Masonry/Masonry.h>

NSString * const STExploreCellIdentifier = @"STExploreCellIdentifier";

@interface STExploreViewController () <UITableViewDataSource, UITableViewDelegate>

@property (strong, nonatomic) UITableView *myTableView;

@end

@implementation STExploreViewController

#pragma mark - Property
- (UITableView *)myTableView {
    if (!_myTableView) {
        _myTableView = [[UITableView alloc] initWithFrame:self.view.bounds style:UITableViewStyleGrouped];
        [_myTableView registerClass:[UITableViewCell class] forCellReuseIdentifier:STExploreCellIdentifier];
        _myTableView.delegate = self;
        _myTableView.dataSource = self;
    }

    return _myTableView;
}

#pragma mark - Lifecycle
- (void)viewDidLoad {
    [super viewDidLoad];

    // Setup.
    [self setupUI];
}

#pragma mark - Setup
- (void)setupUI {
    // Use full screen layout.
    self.edgesForExtendedLayout = UIRectEdgeAll;
    self.automaticallyAdjustsScrollViewInsets = YES;
    self.extendedLayoutIncludesOpaqueBars = YES;

    // myTableView.
    [self.view addSubview:self.myTableView];
    [self.myTableView mas_makeConstraints:^(MASConstraintMaker *make) {
        make.edges.equalTo(self.view);
    }];
}

#pragma mark - UITableViewDelegate
- (void)tableView:(UITableView *)tableView didSelectRowAtIndexPath:(NSIndexPath *)indexPath {
    [tableView deselectRowAtIndexPath:indexPath animated:YES];
}

- (CGFloat)tableView:(UITableView *)tableView heightForRowAtIndexPath:(NSIndexPath *)indexPath {
    return 44;
}

#pragma mark - UITableViewDataSource
- (NSInteger)numberOfSectionsInTableView:(UITableView *)tableView {
    return 1;
}

- (NSString *) tableView:(UITableView *)tableView titleForHeaderInSection:(NSInteger)section {
    return @"Header";
}

- (NSInteger)tableView:(UITableView *)tableView numberOfRowsInSection:(NSInteger)section {
    return 1000;
}

- (UITableViewCell *)tableView:(UITableView *)tableView cellForRowAtIndexPath:(NSIndexPath *)indexPath {
    UITableViewCell *cell = [tableView dequeueReusableCellWithIdentifier:STExploreCellIdentifier forIndexPath:indexPath];
    cell.textLabel.text = @"Hi";
    cell.imageView.image = [STCommonUtil imageWithColor:[UIColor redColor] size:CGSizeMake(30, 30)];
    cell.layer.shouldRasterize = YES;
    cell.layer.rasterizationScale = [UIScreen mainScreen].scale;

    return cell;
}

@end
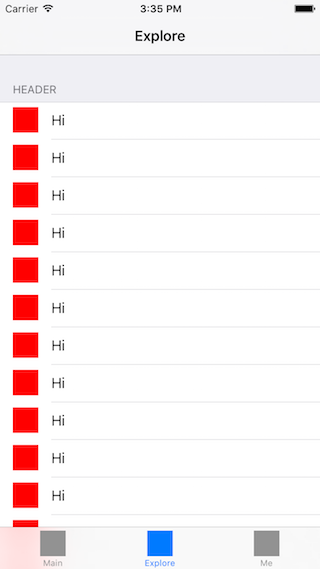
代码解释:我们在 STExploreViewController 中添加了一个 UITableView 作为 subview 来展示数据。UITableView 作为一个封装良好的组件,是通过 Delegate 的方式把它的数据和交互接口暴露给外部。所以在代码中,我们可以看到:
- STExploreViewController 实现了 UITableViewDataSource 和 UITableViewDelegate 接口。
代码:
@interface STExploreViewController () <UITableViewDataSource, UITableViewDelegate>
- myTableView 设置了自己的 delegate 和 datasource 为 self(表示当前的 STExploreViewController 实例)。
代码:
_myTableView.delegate = self;
_myTableView.dataSource = self;
- STExploreViewController 中实现了 UITableViewDataSource 和 UITableViewDelegate 接口一系列的方法。
代码:
- (void)tableView:(UITableView *)tableView didSelectRowAtIndexPath:(NSIndexPath *)indexPath{...}
- (NSInteger)numberOfSectionsInTableView:(UITableView *)tableView{...}
...
运行项目你应该能看到下面的界面:
Demo
你可以接着前面继续下面的步骤来获取这一节对应的 Demo 代码:
如果你还没有下载 iOSStartDemo,请先执行下列命令下载:
$ git clone https://github.com/samirchen/iOSStartDemo.git
$ cd iOSStartDemo/iOSStartDemo
如果已经下载过了,则接着进入正确的目录并执行下列命令:
$ git fetch origin s3
$ git checkout s3
$ pod install
$ open iOSStartDemo.xcworkspace