
AVAudioFoundation(4):音视频录制
2017-05-11
本文主要内容来自 AVFoundation Programming Guide。
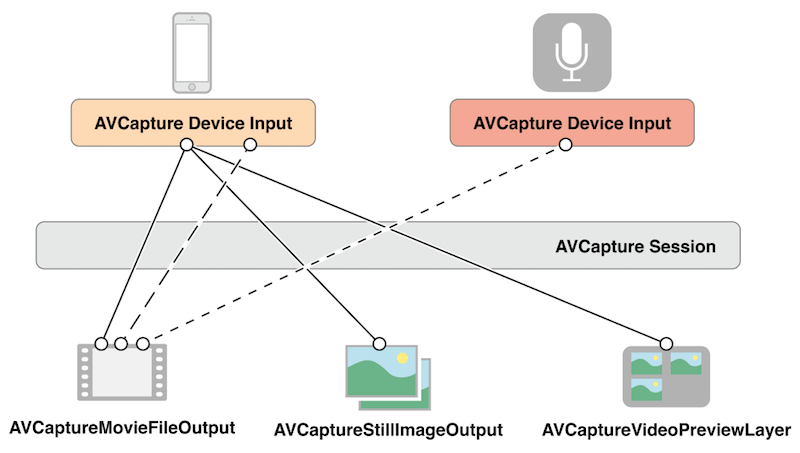
采集设备的音视频时,我们需要组装各路数据,这时可以使用 AVCaptureSession 对象来协调。
- 一个
AVCaptureDevice对象表示输入设备,比如摄像头或者麦克风。 - 一个
AVCaptureInput具体子类的实例可以用来配置输出设备的端口。 - 一个
AVCaptureOutput具体子类的实例可以用来将音视频数据输出到一个视频文件或静态图片。 - 一个
AVCaptureSession实例用来协调输入输出的数据流。
在录制视频时,为了让用户看到预览效果,我们可以使用 AVCaptureVideoPreviewLayer。
下图展示了通过一个 capture session 实例来协调多路输入输出数据:
对于大多数应用场景,这些细节已经足够我们用了。但是对于有些操作,比如当我们想要监测一个音频通道的强度,我们需要了解不同的输入设备的端口对应的对象,以及这些端口和输出是如何连接起来的。
在音视频录制时,输入和输出之间的连接是用 AVCaptureConnection 来表示的。输入方(AVCaptureInput)包含一个或多个输入端口(AVCaptureInputPort),输出端(AVCaptureOutput)可以从一个或多个数据源接收数据,比如一个 AVCaptureMovieFileOutput 就可以同时接收视频和音频数据。
当你往一次录制 session 中添加一个输入或输出时,这个 session 会生成所有兼容的输入和输出端口间的连接,由 AVCaptureConnection 对象表示。
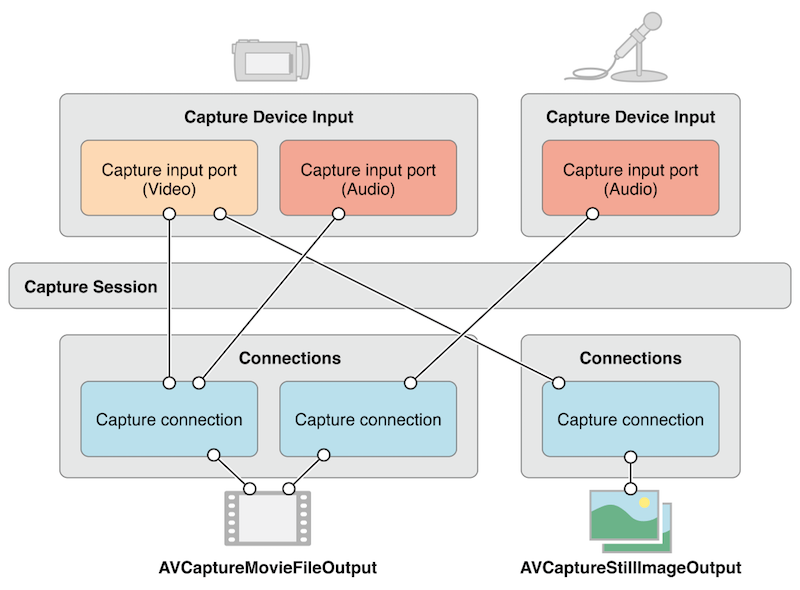
You can use a capture connection to enable or disable the flow of data from a given input or to a given output. You can also use a connection to monitor the average and peak power levels in an audio channel.
我们可以用 connetion 对象来控制输入输出端之间的数据流的断开或连接,我们还能用它来监控 audio 通道的平均值和峰值。
使用 Capture Session 来协调数据流
AVCaptureSession 是我们用来管理数据捕获的核心协调者,我们用它来协调音视频输入和输出端的数据流。我们可以将我们需要的捕获设备添加到 session 中,然后用 startRunning 接口启动数据流,用 stopRunning 停止数据流。
AVCaptureSession *session = [[AVCaptureSession alloc] init];
// Add inputs and outputs.
[session startRunning];
配置 Session
我们可以给 session 设置我们需要的图像质量和分辨率。以下是其中的几个配置选项:
- AVCaptureSessionPresetHigh,高分辨率,具体值取决于设备能提供的最高分辨率。
- AVCaptureSessionPresetMedium,中等分辨率,具体值取决于设备。
- AVCaptureSessionPresetLow,低分辨率,具体指取决于设备。
- AVCaptureSessionPreset640x480,分辨率为 640x480,常称为 480P。
- AVCaptureSessionPreset1280x720,分辨率为 1280x720,常称为 720P。
- AVCaptureSessionPresetPhoto,全尺寸相片的分辨率,这个选项不支持输出视频。
如果要使用某种分辨率选项,我们需要先测试一下设备是否支持:
if ([session canSetSessionPreset:AVCaptureSessionPreset1280x720]) {
    session.sessionPreset = AVCaptureSessionPreset1280x720;
}
else {
    // Handle the failure.
}
如果想对 session 的配置参数做更细粒度的控制,或者想修改已经在运行状态的 session 的配置参数,我们需要在 beginConfiguration 和 commitConfiguration 方法直接做修改。这两个方法的配合,可以使得我们队设备的修改是以一个 group 的方式提交,从而尽量避免视觉或者状态上的不一致性。在调用了 beginConfiguration 之后,我们可以增加或删除输出端,修改 sessionPreset 值,单独配置视频捕获的输入或输出参数。知道我们调用了 commitConfiguration,这些修改采用被提交并一起应用。
[session beginConfiguration];
// Remove an existing capture device.
// Add a new capture device.
// Reset the preset.
[session commitConfiguration];
监控 Session 状态
录制过程中 session 会发出通知来告知其对应的状态,比如 session 开始、结束、被打断。我们可以从 AVCaptureSessionRuntimeErrorNotification 来接收 session 运行时的错误。我们也可以差选 session 的运行时属性来获取其状态是在运行中还是被打断。此外,这些属性都是支持 KVO 监测的,并且通知会被发送到主线程。
使用 AVCaptureDevice 来表示输入设备
AVCaptureDevice 是由我们现实中物理的提供输入数据(比如音频或视频输入)的设备抽象而来,每个 AVCaptureDevice 对象都对应着一个输入设备,比如我们常见的前置摄像头、后置摄像头、麦克风。它们采集的数据将会输出给 AVCaptureSession 实例。
我们可以使用 AVCaptureDevice 的 devices 和 devicesWithMediaType: 类方法来检查哪些是当前可用的设备。如果需要,我们还可以获取设备支持哪些功能。当前可用的设备列表是会动态变化的,有些设备会因为被别的应用使用而变得不可用,有的设备也有可能突然就可用了,所以我们需要注册 AVCaptureDeviceWasConnectedNotification 和 AVCaptureDeviceWasDisconnectedNotification 通知来感知当前可用设备的变化情况。
我们可以使用 capture input 来想向一个 AVCaptureSession 中添加输入设备。
设备特性
我们可以查询采集设备的不同特性。比如,我们可以使用 hasMediaType: 接口来判断采集设备是否支持某种媒体类型,也可以使用 supportsAVCaptureSessionPreset: 接口来判断采集设备是否支持预设的 session preset。我们还能获取设备的位置、本地化命名等信息以便于展示给用户。
下面的示例代码展示了如何遍历设备,并打印设备名:
NSArray *devices = [AVCaptureDevice devices];

for (AVCaptureDevice *device in devices) {

    NSLog(@"Device name: %@", [device localizedName]);

    if ([device hasMediaType:AVMediaTypeVideo]) {

        if ([device position] == AVCaptureDevicePositionBack) {
            NSLog(@"Device position : back");
        }
        else {
            NSLog(@"Device position : front");
        }
    }
}
此外,你还能查出设备的 model ID 和 unique ID。
设备录制设置
不同的设备有不同的能力,比如有些设备支持不同的对焦或刷新模式。下面的代码展示了如何找到一个支持手电筒以及预设的 preset 的设备。
NSArray *devices = [AVCaptureDevice devicesWithMediaType:AVMediaTypeVideo];
NSMutableArray *torchDevices = [[NSMutableArray alloc] init];

for (AVCaptureDevice *device in devices) {
    [if ([device hasTorch] &&
         [device supportsAVCaptureSessionPreset:AVCaptureSessionPreset640x480]) {
        [torchDevices addObject:device];
    }
}
如果你找到多个设备,你可以向用户展示设备的 localizedName 来让用户选择他们需要的设备。在使用对应的设备时,我们可以设置设备的各种工作模式,但是有一点需要注意的是在设置前需要对设备加锁。
聚焦模式
目前支持的聚焦模式有以下几种:
AVCaptureFocusModeLocked:聚焦点固定。通常以拍摄场景的中点作为焦点。AVCaptureFocusModeAutoFocus:自动聚焦。这种模式可以让用户选择一件事物来进行对焦,即使对于的位置不是拍摄场景的中点。AVCaptureFocusModeContinuousAutoFocus:相机将持续自动对焦。
我们可以使用 isFocusModeSupported: 接口来检查设备是否支持相应的聚焦模式,然后设置对应的 focusMode 属性。
我们还能用 focusPointOfInterestSupported 来检查设备是否支持指定焦点,如果支持,我们就可以设置对应的 focusPointOfInterest 属性。其中 {0, 0} 表示左上角,{1, 1} 表示右下角。
我们可以访问 adjustingFocus 属性来获知相机是否正在对焦,这个属性是支持 KVO 的,所以我们可以监测它来获知对焦状态的变化。
如果你修改过了相机的对焦模式相关的设置,你可以用下面的代码将其恢复到默认状态:
if ([currentDevice isFocusModeSupported:AVCaptureFocusModeContinuousAutoFocus]) {
    CGPoint autofocusPoint = CGPointMake(0.5f, 0.5f);
    [currentDevice setFocusPointOfInterest:autofocusPoint];
    [currentDevice setFocusMode:AVCaptureFocusModeContinuousAutoFocus];
}
曝光模式
目前支持的曝光模式有以下几种:
AVCaptureExposureModeLocked,曝光等级锁定。AVCaptureExposureModeAutoExpose,相机自动根据情况调整一次曝光等级,然后将曝光模式切换到AVCaptureExposureModeLocked。AVCaptureExposureModeContinuousAutoExposure,相机随时根据情况调整曝光等级。AVCaptureExposureModeCustom,用户自定义曝光等级。
我们可以通过 isExposureModeSupported: 来检查设备是否支持对应的模式,然后设置对应的 exposureMode 属性。
我们还能用 exposurePointOfInterestSupported 来检查设备是否支持指定曝光点,如果支持,我们就可以设置对应的 exposurePointOfInterest 属性。其中 {0, 0} 表示左上角,{1, 1} 表示右下角。
我们可以访问 adjustingExposure 属性来获知相机是否正在改变曝光设置,这个属性是支持 KVO 的,所以我们可以监测它来获知曝光状态的变化。
如果你修改过了相机的曝光模式相关的设置,你可以用下面的代码将其恢复到默认状态:
if ([currentDevice isExposureModeSupported:AVCaptureExposureModeContinuousAutoExposure]) {
    CGPoint exposurePoint = CGPointMake(0.5f, 0.5f);
    [currentDevice setExposurePointOfInterest:exposurePoint];
    [currentDevice setExposureMode:AVCaptureExposureModeContinuousAutoExposure];
}
闪光灯模式
目前支持的闪光灯模式有如下几种:
AVCaptureFlashModeOff,不会闪光。AVCaptureFlashModeOn,会闪光。AVCaptureFlashModeAuto,根据具体情况决定是否闪光。
我们可以通过 hasFlash 检查设备是否有闪光灯,可以通过 isFlashModeSupported: 检查设备是否支持对应的模式,通过 flashMode 设置对应的模式。
手电筒模式
在手电筒模式下,闪光灯会以低耗电量模式持续打开来为图像录制来照明。目前支持的模式有以下几种:
AVCaptureTorchModeOff,关闭。AVCaptureTorchModeOn,开启。AVCaptureTorchModeAuto,自动。
我们可以通过 hasTorch 检查设备是否有闪光灯,可以通过 isTorchModeSupported: 检查设备是否支持对应的手电筒模式,通过 torchMode 设置对应的模式。
视频防抖
视频防抖主要依赖于硬件,虽然如此,也不是所有的视频格式和分辨率都能支持。此外,开启防抖也会带来为视频录制带来一定的延迟。我们可以通过 videoStabilizationEnabled 来检查是否启动了防抖,通过 enablesVideoStabilizationWhenAvailable 来允许应用在条件支持的情况下自动开启防抖。
白平衡
目前支持面几种白平衡模式:
AVCaptureWhiteBalanceModeLocked,固定模式。AVCaptureWhiteBalanceModeAutoWhiteBalance,自动模式。相机根据情况调整一次白平衡,然后切换至AVCaptureWhiteBalanceModeLocked模式。AVCaptureWhiteBalanceModeContinuousAutoWhiteBalance,相机随时根据情况调整白平衡。
我们可以通过 isWhiteBalanceModeSupported: 检查是否支持给定的模式,然后通过 whiteBalanceMode 设置对应模式。
我们可以访问 adjustingWhiteBalance 属性来获知相机是否正在改变白平衡设置,这个属性是支持 KVO 的,所以我们可以监测它来获知白平衡状态的变化。
设置方向
我们可以通过 AVCaptureConnection 实例来设置想要在 AVCaptureOutput(AVCaptureMovieFileOutput, AVCaptureStillImageOutput, AVCaptureVideoDataOutput) 获得的图像方向。
我们通过 isVideoOrientationSupported 检查是否支持改变视频方向,通过 videoOrientation 设置方向。
下面是示例代码:
AVCaptureConnection *captureConnection = <#A capture connection#>;
if ([captureConnection isVideoOrientationSupported]) {
    AVCaptureVideoOrientation orientation = AVCaptureVideoOrientationLandscapeLeft;
    [captureConnection setVideoOrientation:orientation];
}
配置设备
在设置设备的相关属性前,我们需要使用 lockForConfiguration: 来获取一个对设备操作的锁,这样可以避免你在使用设备时被别的应用更改了设置而导致不兼容等问题。
if ([device isFocusModeSupported:AVCaptureFocusModeLocked]) {
    NSError *error = nil;
    if ([device lockForConfiguration:&error]) {
        device.focusMode = AVCaptureFocusModeLocked;
        [device unlockForConfiguration];
    }
    else {
        // Respond to the failure as appropriate.
你应该只在希望设备的设置不能被修改时保持设备锁,不正确的持有设备锁可能会影响其他程序的录制质量。
设备切换
有时候你可能需要在使用时切换设备,比如切换前后摄像头。这时为了避免卡顿或者闪屏,我们可以重新配置一个正在执行的 session,但是我们在修改前后需要分别使用 beginConfiguration 和 commitConfiguration:
AVCaptureSession *session = <#A capture session#>;
[session beginConfiguration];

[session removeInput:frontFacingCameraDeviceInput];
[session addInput:backFacingCameraDeviceInput];

[session commitConfiguration];
当最外的 commitConfiguration 被调用时,所有的配置修改会被一起提交,这样可以保证平滑的切换。
使用 Capture Inputs 来给一个 Session 添加设备
我们可以用 AVCaptureDeviceInput 来给一个 session 添加设备。AVCaptureDeviceInput 是用来管理设备的端口。
NSError *error;
AVCaptureDeviceInput *input = [AVCaptureDeviceInput deviceInputWithDevice:device error:&error];
if (!input) {
    // Handle the error appropriately.
}
我们用 addInput: 来添加设备。我们还可以在添加前用 canAddInput: 来检查一下。
AVCaptureSession *captureSession = <#Get a capture session#>;
AVCaptureDeviceInput *captureDeviceInput = <#Get a capture device input#>;
if ([captureSession canAddInput:captureDeviceInput]) {
    [captureSession addInput:captureDeviceInput];
}
else {
    // Handle the failure.
}
AVCaptureInput 声明一个或者多个媒体数据流。例如,输入设备可以同时提供音频和视频数据。输入提供的每个媒体流都被一个 AVCaptureInputPort 所表示。一个会话使用 AVCaptureConnection 对象来定义一组 AVCaptureInputPort 对象和一个 AVCaptureOutput 之间的映射。
使用 Capture Outputs 来从一个 Session 获取输出
要从一个 capture session 中获取输出,我们需要给它添加一个或多个输出实例,输出实例都是 AVCaptureOutput 的子类。比如:
AVCaptureMovieFileOutput,输出电影文件。AVCaptureVideoDataOutput,当我们需要处理录制得到的视频帧时(比如创建自定义的渲染层),可以用这个。AVCaptureAudioDataOutput,当我们需要处理录制到的音频数据时,可以用这个。AVCaptureStillImageOutput,当我们需要获取静态图片以及对应的 metadata 时,可以用这个。
我们可以使用 addOutput: 向 session 中添加输出实例,我们也可以在加之前,通过 canAddOutput: 来检测要添加的输出实例是否是兼容的。我们可以往一个正在运行状态的 session 中添加输出实例。
AVCaptureSession *captureSession = <#Get a capture session#>;
AVCaptureMovieFileOutput *movieOutput = <#Create and configure a movie output#>;
if ([captureSession canAddOutput:movieOutput]) {
    [captureSession addOutput:movieOutput];
} else {
    // Handle the failure.
}
保存电影文件
使用 AVCaptureMovieFileOutput 将音视频数据保存到文件中时,我们可以做一些输出设置,比如最大录制时长、最大文件尺寸等等。我们还能够在硬盘空间不够时停止录制。
AVCaptureMovieFileOutput *aMovieFileOutput = [[AVCaptureMovieFileOutput alloc] init];
CMTime maxDuration = <#Create a CMTime to represent the maximum duration#>;
aMovieFileOutput.maxRecordedDuration = maxDuration;
aMovieFileOutput.minFreeDiskSpaceLimit = <#An appropriate minimum given the quality of the movie format and the duration#>;
录制时输出的分辨率和码率是根据 capture session 的 sessionPreset 属性而定的。其中视频的编码类型是 H.264,音频的编码类型是 AAC,这个也是由不同的设备类型决定的。
开始录制
我们通过 startRecordingToOutputFileURL:recordingDelegate: 来开始录制,这时你需要提供一个文件 URL 和一个 delegate。这个 URL 不能指向已存在的文件,因为这里的音视频输出不会去覆盖已有的资源。同时我们也必须要有对这个 URL 指向位置的写权限。这里的 delegate 必须遵循 AVCaptureFileOutputRecordingDelegate 协议,而且必须实现 captureOutput:didFinishRecordingToOutputFileAtURL:fromConnections:error: 方法。
AVCaptureMovieFileOutput *aMovieFileOutput = <#Get a movie file output#>;
NSURL *fileURL = <#A file URL that identifies the output location#>;
[aMovieFileOutput startRecordingToOutputFileURL:fileURL recordingDelegate:<#The delegate#>];
在 captureOutput:didFinishRecordingToOutputFileAtURL:fromConnections:error: 方法中,delegate 可以将最终输出的文件写入相册,同时也需要检查和处理各种可能出现的错误。
确保文件写入成功
要确保文件是否成功,我们可以在 captureOutput:didFinishRecordingToOutputFileAtURL:fromConnections:error: 方法中检查 AVErrorRecordingSuccessfullyFinishedKey。
- (void)captureOutput:(AVCaptureFileOutput *)captureOutput didFinishRecordingToOutputFileAtURL:(NSURL *)outputFileURL fromConnections:(NSArray *)connections error:(NSError *)error {

    BOOL recordedSuccessfully = YES;
    if ([error code] != noErr) {
        // A problem occurred: Find out if the recording was successful.
        id value = [[error userInfo] objectForKey:AVErrorRecordingSuccessfullyFinishedKey];
        if (value) {
            recordedSuccessfully = [value boolValue];
        }
    }
    // Continue as appropriate...
我们需要检查 error 的 userInfo 的 AVErrorRecordingSuccessfullyFinishedKey 对应的值,因为有时候即使我们收到了错误,文件也可能是保存成功的,这时候,有可能是触及了我们设置的某些限制,比如 AVErrorMaximumDurationReached 或者 AVErrorMaximumFileSizeReached,其他的原因还有:
AVErrorDiskFull,磁盘空间不够。AVErrorDeviceWasDisconnected,录制设备断开连接。AVErrorSessionWasInterrupted,录制 session 被打断了,比如来电话了。
给文件添加 Metadata
我们可以在任何时候给录制的文件设置 metadata,即使是在录制过程中。文件的 metadata 是由一系列的 AVMetadataItem 对象表示,我们可以用 AVMutableMetadataItem 来创建我们自己的 metadata。
AVCaptureMovieFileOutput *aMovieFileOutput = <#Get a movie file output#>;
NSArray *existingMetadataArray = aMovieFileOutput.metadata;
NSMutableArray *newMetadataArray = nil;
if (existingMetadataArray) {
    newMetadataArray = [existingMetadataArray mutableCopy];
} else {
    newMetadataArray = [[NSMutableArray alloc] init];
}

AVMutableMetadataItem *item = [[AVMutableMetadataItem alloc] init];
item.keySpace = AVMetadataKeySpaceCommon;
item.key = AVMetadataCommonKeyLocation;

CLLocation *location - <#The location to set#>;
item.value = [NSString stringWithFormat:@"%+08.4lf%+09.4lf/" location.coordinate.latitude, location.coordinate.longitude];

[newMetadataArray addObject:item];

aMovieFileOutput.metadata = newMetadataArray;
处理视频帧
AVCaptureVideoDataOutput 对象使用代理来对外暴露视频帧,我们通过 setSampleBufferDelegate:queue: 来设置代理。除了设置代理以外,还需要设置一个 serial queue 来供代理调用,这里必须使用 serial queue 来保证传给 delegate 的帧数据的顺序正确。我们可以使用这个 queue 来分发和处理视频帧,这里可以参考一下例子 SquareCam。
captureOutput:didOutputSampleBuffer:fromConnection: 中输出的视频帧数据是用 CMSampleBufferRef 来表示的。默认情况下,这个 buffer 的数据格式来自于相机能最高效处理的格式。我们可以通过 videoSettings 来设置一个自定义的输出格式,这个值是一个字典,现在支持的键包括 kCVPixelBufferPixelFormatTypeKey。推荐的 pixel formats 可以通过 availableVideoCVPixelFormatTypes 属性获得,此外还能通过 availableVideoCodecTypes 获得支持编码类型。Core Graphics 和 OpenGL 都能很好地处理 BGRA 格式。
AVCaptureVideoDataOutput *videoDataOutput = [AVCaptureVideoDataOutput new];
NSDictionary *newSettings = @{(NSString *) kCVPixelBufferPixelFormatTypeKey: @(kCVPixelFormatType_32BGRA)};
videoDataOutput.videoSettings = newSettings;

 // discard if the data output queue is blocked (as we process the still image
[videoDataOutput setAlwaysDiscardsLateVideoFrames:YES];)

// create a serial dispatch queue used for the sample buffer delegate as well as when a still image is captured
// a serial dispatch queue must be used to guarantee that video frames will be delivered in order
// see the header doc for setSampleBufferDelegate:queue: for more information
videoDataOutputQueue = dispatch_queue_create("VideoDataOutputQueue", DISPATCH_QUEUE_SERIAL);
[videoDataOutput setSampleBufferDelegate:self queue:videoDataOutputQueue];

AVCaptureSession *captureSession = <#The Capture Session#>;

if ([captureSession canAddOutput:videoDataOutput]) {
    [captureSession addOutput:videoDataOutput];
}
处理视频的性能问题
对于我们的应用,设置够用的分辨率就好了,不要太高,那样性能会降低。
我们需要确保,在 captureOutput:didOutputSampleBuffer:fromConnection: 中处理视频帧的时间开销不要超过分配给一帧的处理时长。如果这里处理的太长,那么 AV Foundation 将会停止发送视频帧给代理,也会停止发给其他输出端,比如 preview layer。
你可以使用 AVCaptureVideoDataOutput 的 minFrameDuration 属性来确保你有足够的时间来处理一帧。同时,我们还可以设置 alwaysDiscardsLateVideoFrames 为 YES 来确保晚到的帧会被丢掉来避免延迟。如果你不介意延迟,而更想要处理更多的帧,那就设置这个值为 NO,但是这并不意味着不会丢帧,只是不会被那么早或那么高效的丢掉。
截取静态图片
当我们想要截取带着 metadata 的静态图片时,我们可以用 AVCaptureStillImageOutput。截出的图的分辨率依赖于 session 的 preset 和具体的设备。
像素和编码类型
不同的类型支持不同的图片格式。我们可以用 availableImageDataCVPixelFormatTypes 和 availableImageDataCodecTypes 来检查当前的设备支持的像素类型和编码类型。然后,我们可以通过设置 outputSettings 属性指定图片的格式。
AVCaptureStillImageOutput *stillImageOutput = [[AVCaptureStillImageOutput alloc] init];
NSDictionary *outputSettings = @{AVVideoCodecKey: AVVideoCodecJPEG};
[stillImageOutput setOutputSettings:outputSettings];
如果我们要截取一张 JPEG 图片,你最好不要指定你自己的压缩格式,相反,你需要做的是让 AVCaptureStillImageOutput 帮你做压缩,因为它使用硬件加速来压缩。如果这时你需要图像的数据,可以用 jpegStillImageNSDataRepresentation: 来获取对应的 NSData 对象,这个数据是未经压缩的,甚至你都可以修改它。
捕获图像
当截图时,我们使用 captureStillImageAsynchronouslyFromConnection:completionHandler: 方法,其中的第一个参数是对应的 connection,这是你需要查找一下哪个 connection 的输出端口是在手机视频:
AVCaptureConnection *videoConnection = nil;
for (AVCaptureConnection *connection in stillImageOutput.connections) {
    for (AVCaptureInputPort *port in [connection inputPorts]) {
        if ([[port mediaType] isEqual:AVMediaTypeVideo] ) {
            videoConnection = connection;
            break;
        }
    }
    if (videoConnection) { break; }
}
第二个参数是一个 block 回调,其中带回两个参数:一个包含图像数据的 CMSampleBuffer,一个 NSError。这个 sample buffer 中可能包含着 metadata,比如一个 EXIF 字典作为附属信息。我们可以去修改附属信息,但是需要注意针对 JPEG 图像的像素和编码上的优化。
[stillImageOutput captureStillImageAsynchronouslyFromConnection:videoConnection completionHandler:^(CMSampleBufferRef imageSampleBuffer, NSError *error) {
    CFDictionaryRef exifAttachments =
        CMGetAttachment(imageSampleBuffer, kCGImagePropertyExifDictionary, NULL);
    if (exifAttachments) {
        // Do something with the attachments.
    }
    // Continue as appropriate.
}];
预览
视频预览
我们可以用 AVCaptureVideoPreviewLayer 来给用户提供预览,我们不需要任何 output 对象来展示预览。此外,我们可以使用 AVCaptureVideoDataOutput 来在给用户预览之前获取到图像像素级别的数据。
Unlike a capture output, a video preview layer maintains a strong reference to the session with which it is associated. This is to ensure that the session is not deallocated while the layer is attempting to display video. This is reflected in the way you initialize a preview layer:
不像 capture output,一个 video preview layer 会持有一个关联 session 的强引用。这样来防止 layer 在展示预览时而 session 被释放引起问题。
AVCaptureSession *captureSession = <#Get a capture session#>;
CALayer *viewLayer = <#Get a layer from the view in which you want to present the preview#>;

AVCaptureVideoPreviewLayer *captureVideoPreviewLayer = [[AVCaptureVideoPreviewLayer alloc] initWithSession:captureSession];
[viewLayer addSublayer:captureVideoPreviewLayer];
一般来说,preview layer 和其他 CALayer 对象一样,我们可以缩放它的图像,执行变换,旋转。一个不同的地方是,我们需要设置 layer 的 orientation 属性来指定它改如何旋转从相机获得的图像。此外,我们可以用 supportsVideoMirroring 来测试设备是否支持视频镜面效果(左右翻转),我们可以设置 videoMirrored 来配置是否开启镜面效果,即使 automaticallyAdjustsVideoMirroring 被设置为默认的 YES 也没问题(这个值是在配置 session 时被自动设置的)。
视频重力模式
我们可以通过 videoGravity 属性设置视频重力模式,比如:
AVLayerVideoGravityResizeAspect,保持视频的宽高比;不一定完全填充,可能留黑边;不裁剪视频,。AVLayerVideoGravityResizeAspectFill,保持视频的宽高比;完全填充,不留黑边;可能裁剪视频。AVLayerVideoGravityResize,不保持视频宽高比,可能扭曲画面;完全填充;不裁剪视频。
使用预览时的点击聚焦
需要注意的是,在实现点击聚焦时必须考虑到该层的预览方向和重力,并考虑预览变为镜像显示的可能性。可以参考实例项目:AVCam-iOS: Using AVFoundation to Capture Images and Movies。
显示音频等级
To monitor the average and peak power levels in an audio channel in a capture connection, you use an AVCaptureAudioChannel object. Audio levels are not key-value observable, so you must poll for updated levels as often as you want to update your user interface (for example, 10 times a second).
要监测 capture connection 中音频通道的平均强度和峰值强度,我们可以用 AVCaptureAudioChannel。音频等级是不支持 KVO 监测的,所以当我们想更新用户界面时,我们需要去查询。
AVCaptureAudioDataOutput *audioDataOutput = <#Get the audio data output#>;
NSArray *connections = audioDataOutput.connections;
if ([connections count] > 0) {
    // There should be only one connection to an AVCaptureAudioDataOutput.
    AVCaptureConnection *connection = [connections objectAtIndex:0];

    NSArray *audioChannels = connection.audioChannels;

    for (AVCaptureAudioChannel *channel in audioChannels) {
        float avg = channel.averagePowerLevel;
        float peak = channel.peakHoldLevel;
        // Update the level meter user interface.
    }
}
一个完整示例
这里的示例代码将展示如何获取视频并转化为 UIImage。大概包括下面几步:
- 创建一个
AVCaptureSession对象来协调输入设备到输出的数据流。 - 找到我们想要的
AVCaptureDevice。 - 为 device 创建一个
AVCaptureDeviceInput对象。 - 创建
AVCaptureVideoDataOutput来输出视频帧。 - 实现
AVCaptureVideoDataOutput的delegate方法来处理视频帧。 - 在实现的代理方法中将
CMSampleBuffer转为UIImage。
代码如下:
// 创建并配置 Capture Session:
AVCaptureSession *session = [[AVCaptureSession alloc] init];
session.sessionPreset = AVCaptureSessionPresetMedium;

// 创建和配置 Device 和 Device Input:
AVCaptureDevice *device = [AVCaptureDevice defaultDeviceWithMediaType:AVMediaTypeVideo];

NSError *error = nil;
AVCaptureDeviceInput *input = [AVCaptureDeviceInput deviceInputWithDevice:device error:&error];
if (!input) {
    // Handle the error appropriately.
}
[session addInput:input];

// 创建和配置 Video Data Output:
AVCaptureVideoDataOutput *output = [[AVCaptureVideoDataOutput alloc] init];
[session addOutput:output];
output.videoSettings = @{(NSString *) kCVPixelBufferPixelFormatTypeKey: @(kCVPixelFormatType_32BGRA)};
output.minFrameDuration = CMTimeMake(1, 15);
// 设置 Video Data Output 的 delegate 和处理队列:
dispatch_queue_t queue = dispatch_queue_create("MyQueue", NULL);
[output setSampleBufferDelegate:self queue:queue];
代理方法实现:
- (void)captureOutput:(AVCaptureOutput *)captureOutput didOutputSampleBuffer:(CMSampleBufferRef)sampleBuffer fromConnection:(AVCaptureConnection *)connection {

    UIImage *image = imageFromSampleBuffer(sampleBuffer);
    // Add your code here that uses the image.
}
开始录制:
录制前,还需要注意申请相机权限:
// 申请权限:
NSString *mediaType = AVMediaTypeVideo;

[AVCaptureDevice requestAccessForMediaType:mediaType completionHandler:^(BOOL granted) {
    if (granted) {
        //Granted access to mediaType
        [self setDeviceAuthorized:YES];
    } else {
        //Not granted access to mediaType
        dispatch_async(dispatch_get_main_queue(), ^{
            [[[UIAlertView alloc] initWithTitle:@"AVCam!"
                                    message:@"AVCam doesn't have permission to use Camera, please change privacy settings"
                                   delegate:self
                          cancelButtonTitle:@"OK"
                          otherButtonTitles:nil] show];
            [self setDeviceAuthorized:NO];
        });
    }
}];
开始录制方法:
[session startRunning];
停止录制方法:
[session stopRunning];
高帧率视频获取
iOS 7 以后在一些设备中引入了高帧率视频捕获的支持。我们可以通过 AVCaptureDeviceFormat 来查询设备支持的媒体类型、帧率、缩放比、视频防抖等。在 AVFoundation 中:
- 支持捕获分辨率 720p 及以上、帧率 60 fps、视频防抖、P 帧丢帧。
- 播放方面增强了对音频加速和慢速播放的支持。
- 编辑方面提供了全面的编辑能力支持。
- 输出方面支持两种方式输出帧率达 60 fps 的影视文件。一种是输出为可变帧率,支持慢速或快速播放。另一种是输出为任意指定帧率,比如 30 fps。
需要注意的是,现在最新的 iOS 版本支持的能力会比以上这些更多更强大。
播放
播放时,可以通过 AVPlayer 设置 rate 属性来设置播放速率。
AVPlayerItem 可以支持通过 audioTimePitchAlgorithm 属性来设置当你用不同的速率播放视频时,该如何播放音频。以下是相关选项:
AVAudioTimePitchAlgorithmLowQualityZeroLatency,较低音质,适应多种播放速率。适宜的速率:0.5, 0.666667, 0.8, 1.0, 1.25, 1.5, 2.0.AVAudioTimePitchAlgorithmTimeDomain,普通音质。适宜的速率:0.5–2x。AVAudioTimePitchAlgorithmSpectral,最高音质,性能消耗较大。适宜的速率:1/32–32。AVAudioTimePitchAlgorithmVarispeed,高音质。适宜的速率:1/32–32。
编辑
通常使用 AVMutableComposition 来做音视频编辑:
- 使用
composition类方法类创建AVMutableComposition对象。 - 使用
insertTimeRange:ofAsset:atTime:error:来插入音视频数据。 - 使用
scaleTimeRange:toDuration:来设置音视频数据的时间区间。
导出
可以使用 AVAssetExportSession 来导出 60 fps 的视频,可以用以下两种方式:
- 使用
AVAssetExportPresetPassthroughpreset 来编码重新编码视频。它会重新处理那些标记为 60 fps、降速、加速区域的时间。 - 使用一个固定帧率来保证导出视频的最大兼容性。比如设置 video composition 的
frameDuration为 30 fps。比如设置 export session 的audioTimePitchAlgorithm来配置音频播放选项。
录制
我们用 AVCaptureMovieFileOutput 来录制高帧率的视频,它会默认支持高帧率的视频录制,会默认选择正确的 H264 pitch level 和比特率。
如果想要做一些自定义录制,我们必须使用 AVAssetWriter,这个则需要一些额外的创建过程。
通常我们需要设置一下:
assetWriterInput.expectsMediaDataInRealTime = YES;
来保证视频捕获能跟得上传入的数据。